Opiem10
Well-known member
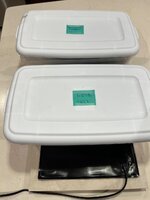
I want to give quick summary of a modified shoebox rooting method I have used in the past.
Supplies:
Plastic shoeboxes (4)
Plastic lids (2)
10 X 20 seedling mat ( no thermostat)
Rubber mat
12 x 24 inch ceramic tile
Razor knife
Diluted Clonex gel
Small chip brush
Fig cuttings (5 per box)
Coconut coir (just barely moist)
Process:
1) Fill a shoebox about 1/3 the way with coconut coir. Push coir up against one small side of the box. The coir might mound up to about 1” from the top lip of the box.
2) Make two shallow slits on the sides of old leaf nodes, up about 2 inches from the bottom of each cutting.
3) Brush the diluted (one part Clonex, 1 part water) Clonex over the bottom, both slits and over any old nodes which will be inserted into the coir.
4) Insert the cutting into the mound of coir, about halfway up from the bottom of the box. Space cuttings within the mound of coir and compact the coir so cuttings are securely in place.
Cover the shoebox, label with cultivar(s) being rooted, and write the date you performed these steps.
5) in another, empty shoebox, fill with about 3/4 “ of water. The water acts as a buffer with the heat mat.
6) place the shoebox with cuttings inside the shoebox with water and set these boxes on your heat mat. The mat may hold up to two shoebox setups.
7) I open the shoebox covers every day or two. Any moisture accumulating on the cover is allowed to drain onto the coir. As long as there is moisture seen on the plastic top, the media is moist enough.
You might see signs of roots developing along the side or bottom of the shoebox. BE PATIENT. Cuttings usually have an advanced root mass after 1 month.
We’ll check on the Battaglia Green and I-258 cuttings near the end of the year and hope for up-potting during the first week of January.