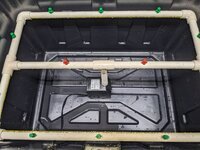
I Built an Aeroponic Rooting Thing

ohiobruce

Well-known member
Inspired by @goodnessatlanta 's post and video, and aggravated that fungus gnats are buzzing around my first rooting attempts, I decided to try a hydroponic system.

I didn't want to pay the high price for a good, complete system, so I decided to spend twice as much and build one myself. Just kidding, sort of.

Actually, I wanted one with large holes to make it easier to remove a large root mass. I also wanted to be able to easily remove the cutting and take a look. (The curse of a newbie.)

So I drilled 2.5" holes in the tote and made an easily removable basket. These are 3d printed and are thin and quick to print. I can easily cut them apart if I need the extra clearance. I plan to use a pool noodle to hold the cutting.

The pump and manifold are standard stuff found on many diy sites and videos.

I still need to route the electric cord out of the side of the tub and maybe come up with a gasket.

I also need to buy a timer.

Cost?
$10 Tub
$15 Water pump
$5 Nozzles
$18 for CPVC pipe and fittings.
Timer will be about $15

Not as bad as I thought it would be.

Once I get some cuttings, I'll report back with the results.
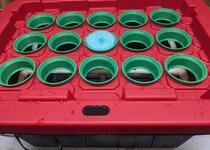

Cloner Top.jpg

Cloner Basket.jpg

Cloner Sprayer.jpg
 
It's been my experience these work great in the beginning, but eventually they seem to get some kind of bacteria. Might also be a UV unit you could add or check out MycoStop at that point.

The unit looks Great! You did a 1st class job on it. Wishing you much success, keep us posted.
 
Inspired by @goodnessatlanta 's post and video, and aggravated that fungus gnats are buzzing around my first rooting attempts, I decided to try a hydroponic system.

I didn't want to pay the high price for a good, complete system, so I decided to spend twice as much and build one myself. Just kidding, sort of.

Actually, I wanted one with large holes to make it easier to remove a large root mass. I also wanted to be able to easily remove the cutting and take a look. (The curse of a newbie.)

So I drilled 2.5" holes in the tote and made an easily removable basket. These are 3d printed and are thin and quick to print. I can easily cut them apart if I need the extra clearance. I plan to use a pool noodle to hold the cutting.

The pump and manifold are standard stuff found on many diy sites and videos.

I still need to route the electric cord out of the side of the tub and maybe come up with a gasket.

I also need to buy a timer.

Cost?
$10 Tub
$15 Water pump
$5 Nozzles
$18 for CPVC pipe and fittings.
Timer will be about $15

Not as bad as I thought it would be.

Once I get some cuttings, I'll report back with the results.
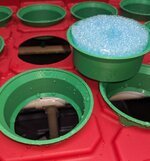

View attachment 14969

View attachment 14970

View attachment 14973
Very cool! Yours looks much better than my MacGyver bubble cloner. Great work 👏
 
I did try this early on in my testing different methods.
My success rate was probably a little short of 50%.
Not to say i wasn't doing something wrong.
But I gave up on it after 1 season.

Please post your experience, im curious to see how they turn out.
 
I'd suggest green/active cuttings for this instead of dormant+lignified.

How long does it take - usually a couple of cycles, like a few months.

Watch your temperature, over about 75°-78°F, I think encourages the bacteria. The pump adds heat, so keep it as small as possible or control it with a timer so it's on for shorter period at a time.
 
Your “I didn't want to pay the high price for a good, complete system, so I decided to spend twice as much and build one myself. Just kidding, sort of.” totally made me have a mom trauma flashback to taking my daughters to Michael’s craft store to make whatever (school project/craft/fun thing), and then checking out thinking, “How did I just spend $60 on that…”.

Inside thought: I could have just bought the damn thing already made for half of that price…😆

Edit: my ramblings aside, your system looks really cool. Please keep us updated! 😊
 
Last edited:
Your “I didn't want to pay the high price for a good, complete system, so I decided to spend twice as much and build one myself. Just kidding, sort of.” totally made me have a mom flashback to taking my daughters to Michael’s craft store to make whatever (school project/craft/fun thing), and then checking out thinking, “How did I just spend $60 on that…”.

Inside thought: I could have just bought the damn thing already made for half of that price…😆
Way bigger feeling of satisfaction for making a thing that works well from scratch. And he has good point about the oversized lid holes to extricate the rooted cutting.
Cuttings are going in the mail today, said 2 day estimate.
 
Way bigger feeling of satisfaction for making a thing that works well from scratch. And he has good point about the oversized lid holes to extricate the rooted cutting.
Cuttings are going in the mail today, said 2 day estimate.

Thanks!

I've been pouring over all the the hydo/aeroponic rooting info I can find and see that it will either immediately kill all of one's cuttings, or cause them to burst into life overnight. Lol.

So I have to try it myself.

Since we're experimenting, are there any variables you like to see me try? Scrape or not, rooting hormone or not, sealed with wax or Parafilm, etc...
I don't have any experience with this method but always thought it was worth trying. I've seen videos of grower doing it with green tips.
Water temp would be a concern of mine. Maybe an aquarium heater in the reservoir and a insulation wrap on the bottom and sides to preserve the temps.
 
Back
Top